


Due to the lack of Chinese bakeries around Ottawa, I find myself always craving certain Chinese baked goods. It's good because it forces me to try to bake all these Chinese desserts and pastries (although sometimes successful, sometimes not). A few weeks back, I tried making another favorite dessert of mine - asian style/sponge cheesecake. Yes, there is "Asian style" cheesecake. What's the difference? Well I'm sure you are familar with regular cheese cake. It's thick, its cheesy, and its rich. Now think of the texture and taste of sponge cake. Light, fluffy, kinda spongey. Asian cheesecake is supposed to be somewhat in between. Can't really describe it, but you'll understand once you taste it.
To make it, I found a recipe online, and made a few modifications to make baking it easier.The recipe makes about 2 pie pans worth of cheesecake. I had some extra cupcake cups, so I decided to bake one cake, and the rest in the little cupcake cups for variety. For the ingredients, you need:
- 250 ml milk
- 1 stick package or 250 g philly cream cheese
- 1/2 stick or 60 g butter
- 6 egg (seperate yolk and whites)
- 0.45 cups cake flour
- 0.15 cups corn starch
- 1 tsp lemon juice
- 1/4 tsp cream of tartar
- 130 gm caster sugar
1. Pour the milk into a large stove top pot or bowl, and heat over extra-low heat. I used a glass pot.
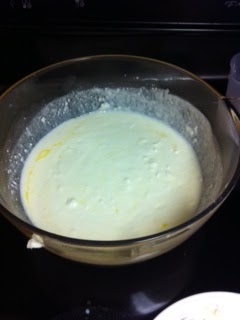

2. Mircowave the cream cheese until soft, but not melted. Then stir in chunks of the cream cheese into the pot of milk. Repeat the same for the stick of butter. Stir until the mixture is completely smooth. At this point, I used an electric mixer to mix.
3. Remove from heat and let cool. You want to make sure your mixture is not too hot because at this point, you want to add in your egg yolks but you don't want them to cook in the mixture. Add the egg yolk once you feel the mixture is luke warm and mix well.
4. Add cake flour and corn starch. Sift in the flours into the cream cheese mixture, a small amount at a time. Mix well between every addition, and make sure there aren’t any flour lumps. Then stir in the lemon juice.

5. In a separate bowl, use an electric mixture to beat egg whites until fluffy. Then, add the cream of tartar and sugar and mix again until you get stiff peaks. Mine turned out a bit watery at this stage, which may have made the cheesecake less fluffy.
6. Fold the egg whites into the cream cheese mixture, do not stir or beat. I kinda failed a bit here and ended up mixing, which also might have caused the cake to be less fluffy.


7. Finally pour the mixture into your pans/cups, and bake in a 325 degree oven for about 50-60 minutes, or until it passes the toothpick test.
8. Remove from the oven and let cook completely. Then chill in the fridge for at least 3 hours. And its ready to eat! :)
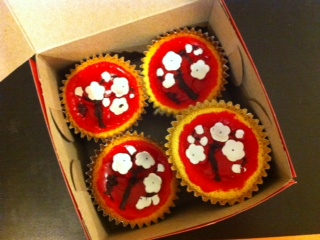
My cakes ended up being not too fluffy, but still tasted pretty good. The next day, I thought the cupcakes looked a little bland, so I decided to decorate them (since they were supposed to be a present also). I bought some red stackable cookie frosting, little candy flowers, and used a bar of dark chocolate that I had left over to try to make them look awesome.

No comments:
Post a Comment